
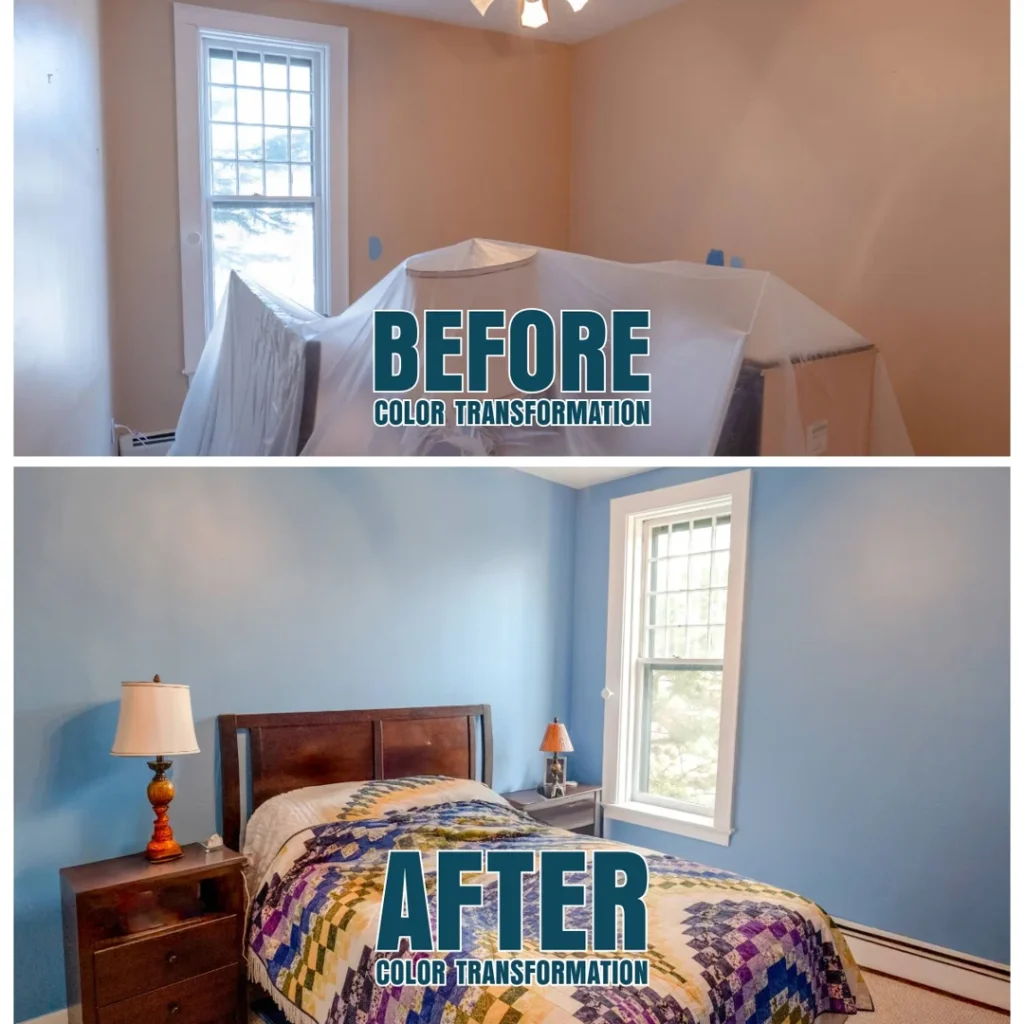
Is One Room Painting a Good Weekend Project?
One room painting is one of the fastest, most affordable ways to refresh your home — and yes, it’s absolutely doable in a weekend if you plan ahead.
Here’s what a successful one-room painting project looks like from start to finish:
- Gather supplies – brushes, rollers, painter’s tape, drop cloths, primer, and paint
- Prep the room – move furniture, patch holes, clean walls, and tape edges
- Paint in the right order – ceiling first, then trim, then walls
- Apply two coats – wait 1-2 hours between coats for full coverage
- Clean up – remove tape while paint is still wet, clean tools, ventilate the room
Most standard rooms take two to three days from prep to final coat — but with good preparation, you can realistically complete a small room over a single weekend.
Fresh paint can completely transform how a room feels. Whether your walls are scuffed from years of use, you’re settling into a new home, or you’re simply ready for a change, a single room is a low-commitment, high-impact place to start. The key isn’t just the painting itself — it’s the preparation, the order of operations, and the techniques that separate a rushed, patchy result from a finish that looks like a professional did it.
In Rhode Island and coastal New England, there’s an added layer of complexity. Salt air, humidity, and seasonal moisture can affect how paint adheres and how long it lasts — so getting the details right matters even more.
I’m Douglas Smyth, founder of Smyth Painting Co., and I’ve been helping Rhode Island homeowners nail their one room painting projects since 2005. In this guide, I’ll walk you through exactly what we’ve learned works — from prep to final coat.

One room painting word guide:
Master the Art of One Room Painting
When you decide to tackle a one room painting project, the difference between a “DIY look” and a professional finish often comes down to the first hour of work. In our experience serving coastal communities from Newport to Little Compton, we’ve seen that the most successful projects begin with a clear plan and the right inventory.
Calculating your paint needs is the first hurdle. A general rule of thumb, often recommended by Benjamin Moore, is that one gallon covers approximately 350 to 400 square feet with a single coat. However, most rooms require at least two coats for true color depth and durability. If you are painting a standard 12×12 bedroom with 8-foot ceilings, you are looking at roughly 384 square feet of wall space. Factor in two coats, and you’ll want two gallons on hand to ensure you don’t run out mid-wall—a mistake that can lead to visible seams or “flashing.”
| Feature | DIY Effort | Professional Efficiency |
|---|---|---|
| Setup Time | 2-4 Hours | 1 Hour |
| Wall Prep | Often overlooked | Thorough (Sanding/Patching) |
| Speed | 2-3 Days | 1-2 Days |
| Finish Quality | Variable | Flawless & Warrantied |
| Cleanup | Tedious | Included & Seamless |
Essential Tools for a One Room Painting Project
To achieve professional results, you need professional-grade tools. Don’t settle for the “all-in-one” kits found in big-box bargain bins. Instead, invest in:
- A 2.5-inch Angled Sash Brush: This is your best friend for “cutting in” around trim and ceilings. The angle allows for better control and crisper lines.
- A High-Quality Roller Frame and Nap: For typical interior walls in Rhode Island homes, a 3/8-inch nap roller cover is standard. It holds enough paint to provide good coverage without leaving an overly heavy texture.
- Canvas Drop Cloths: Unlike plastic, canvas stays in place and absorbs drips rather than letting them sit on the surface where you might step in them.
- Painter’s Tape: Use a high-quality tape and seal the edges with a putty knife or credit card to prevent bleed-through.
For those who find the tool list daunting or have a room with complex architectural details, our interior painting services offer a stress-free alternative where we bring the best equipment directly to your door.
Preparing Your Space for New England Humidity
In coastal areas like Narragansett, Jamestown, and Tiverton, humidity isn’t just a summer concern—it’s a constant factor in how paint cures. Salt air and moisture can leave a fine residue on walls that prevents paint from bonding correctly.
Before you even open a paint can, your walls must be clean, dry, and dull. We recommend wiping down surfaces with a damp cloth to remove dust and oils. If you find small cracks or holes—common in older New England homes—apply a lightweight spackle, let it dry, and sand it smooth with 220-grit sandpaper. This step is vital for a flawless finish on drywall.
Timing is also everything. As of April 2026, we suggest keeping an eye on the local dew point. If you’re painting in a particularly humid week, your drying times between coats might need to stretch from the standard 2 hours to 4 hours to ensure the first layer has properly “set.”
The Professional Order of Operations
One of the most common questions we get at Smyth Painting Co. is: “Where do I start?” There is a specific “top-down” logic to one room painting that prevents you from ruining finished surfaces with drips.
- The Ceiling First: If you are painting the ceiling, do it now. Drips are inevitable when working overhead, and it’s much easier to wipe a drip off an unpainted wall than a finished one. For a deep dive into this, see our ceiling painting service guide.
- The Trim and Baseboards: Many DIYers save the trim for last, but pros often do it second. Why? It’s easier to tape off the smooth surface of the trim than it is to tape off the wall. Once the trim is dry, you can tape it and move to the walls. Check out our ultimate guide to trim painting for more details.
- The Walls: This is the final and most satisfying step. By following this order, you ensure that any accidental overlap is covered by the final wall color.
Perfecting the One Room Painting Technique
The actual application of paint is where the magic happens. To avoid “picture framing”—where the edges of the wall look different than the center—you must maintain a “wet edge.” This means you should roll into your cut-in areas while the paint is still wet, blending the two sections seamlessly.
When rolling, use the “W” technique. Imagine drawing a large “W” on the wall (about 3 feet wide), then fill it in without lifting the roller. This ensures even distribution of the paint. Work in small sections, moving from top to bottom. Labor makes up 60% to 90% of a professional job’s value because of the physical effort required to maintain this consistency across an entire room.
Choosing Finishes for Coastal Conditions
Rhode Island weather demands specific paint finishes. In high-moisture areas or rooms with significant sunlight, the sheen you choose matters:
- Matte or Flat: Excellent for hiding imperfections in older plaster walls common in Bristol or Wickford. However, they are harder to clean.
- Eggshell or Satin: The “goldilocks” finishes. They offer a slight luster that reflects light beautifully—perfect for brightening up a coastal cottage—and provide enough moisture resistance to withstand New England humidity.
- Semi-Gloss: Reserved for trim and doors. It’s highly durable and easy to wipe down.
For more help deciding, our guide to paint finishes breaks down the science of sheen.
Post-Paint Cleanup and Care
The job isn’t done when the last wall is covered. Proper cleanup ensures your hard work lasts and your home stays pristine.
- Remove Tape Early: Don’t wait for the paint to be bone-dry to pull the tape. Removing it while the paint is slightly tacky (usually an hour after the final coat) prevents the paint from peeling off with the tape.
- Tool Preservation: Clean your brushes and rollers immediately with warm, soapy water. For high-end brushes, use a brush comb to keep the bristles straight.
- Ventilation: Ensure proper airflow to help the paint cure, but avoid opening windows if it’s a high-pollen or high-humidity day in SE Mass.
Avoiding common DIY painting pitfalls like leaving the tape on too long or neglecting tool care will save you a headache on your next project.
Long-Term Maintenance for Rhode Island Homes
Living near the water means your interior is subject to more stress than an inland home. Interior condensation can lead to mildew if not addressed. We recommend checking corners and window sills for moisture buildup, especially during the transition from winter to spring.
Keep a small “touch-up kit” containing a pint of your wall color and a small brush. This allows you to quickly fix scuffs from moving furniture or pet activity without having to repaint the entire wall. Mastering these small interior painting tips keeps your home looking like it was just professionally refreshed for years to come.
Conclusion: Your Path to a Flawless Finish
A one room painting project is a powerful way to reclaim your space. While the process is straightforward, the details—the prep, the salt-air considerations, and the technical application—are what define the final result.
At Smyth Painting Co., we pride ourselves on bringing high-end residential expertise to every project, whether we are restoring a historic home in Newport or updating a modern space in Barrington. We use eco-friendly options to ensure your home remains healthy and offer a level of detail that only comes from years of experience in the Southern New England climate.
If you’d rather spend your weekend enjoying the Rhode Island coastline than standing on a ladder, we are here to help. Schedule your professional interior painting service with us today and experience a smooth, stress-free transformation.


