
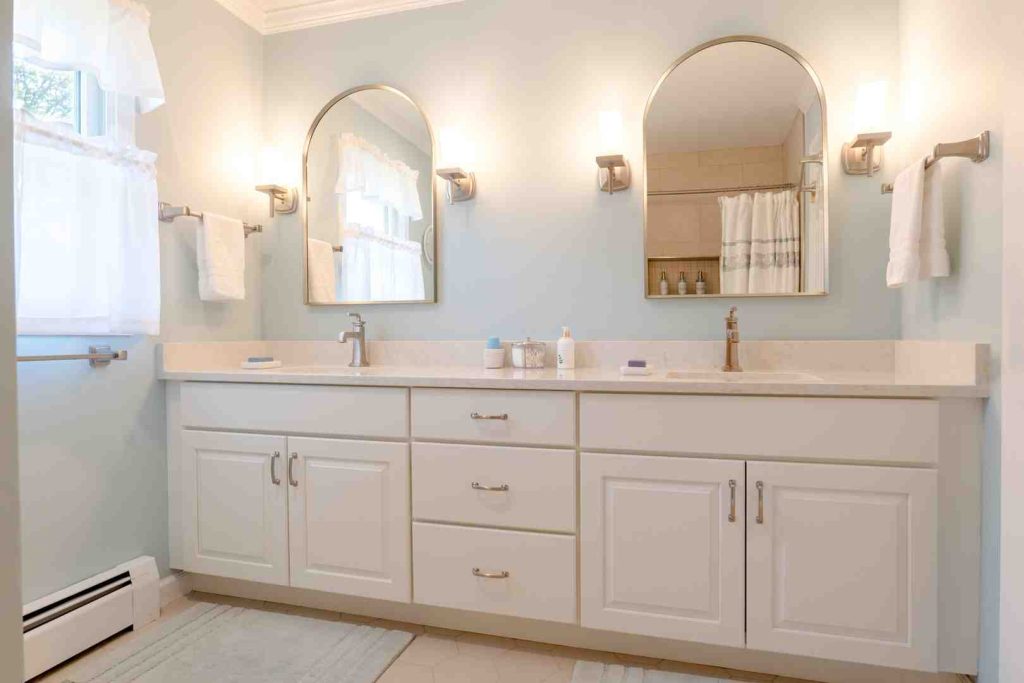
Transform Your Bathroom with a Fresh Vanity Update
Bathroom cabinet painting is a cost-effective way to refresh your bathroom without the expense of full replacement. Here’s what you need to know:
Quick Overview:
- Cost Savings: Painting is a significantly more affordable alternative to full cabinet replacement
- Time Investment: 1-2 days for a complete project, including prep and drying time
- Best Paint Types: Waterborne alkyd or mildew-proof latex in semi-gloss or satin finishes
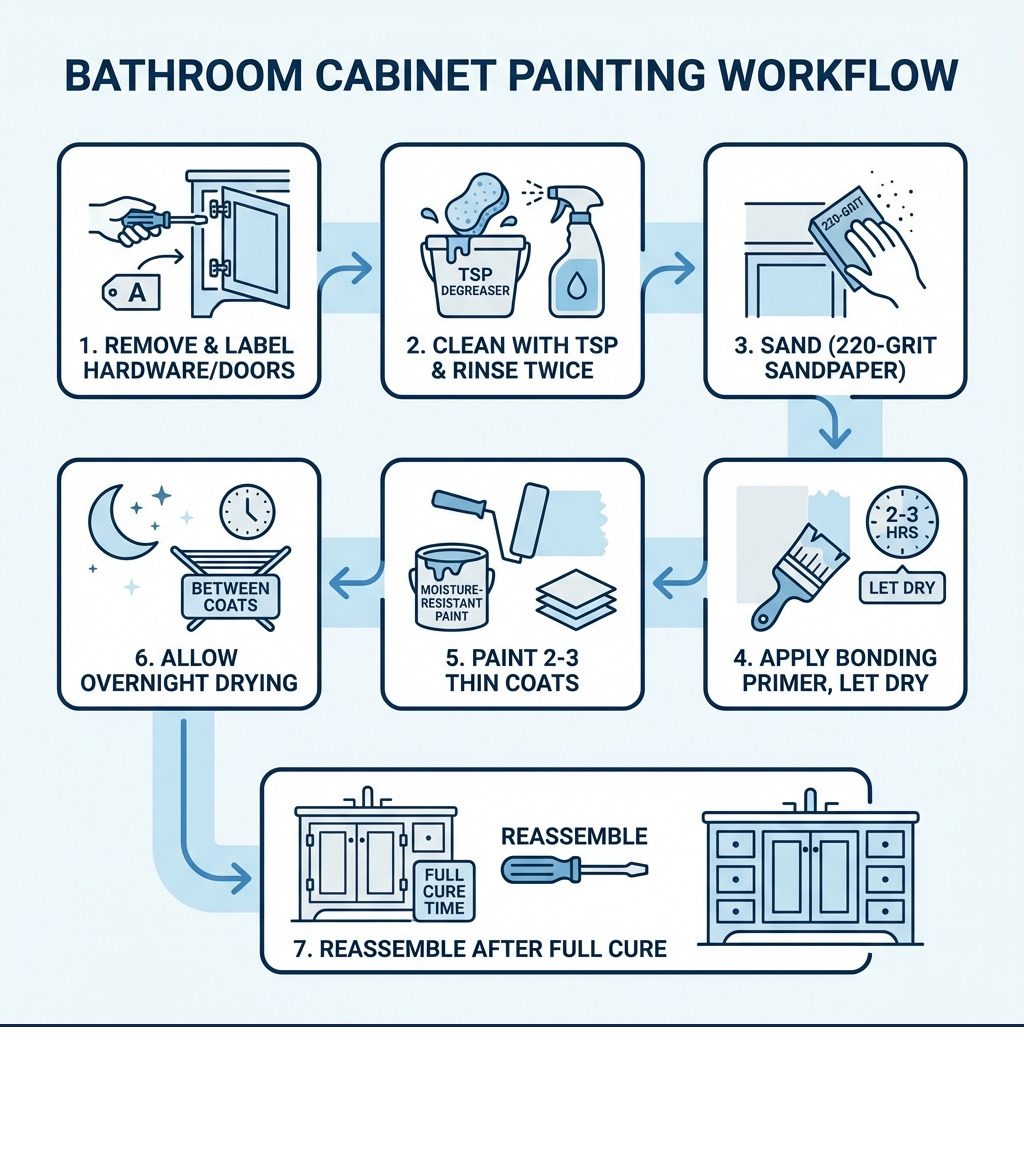
- Key Steps: Clean with TSP, sand with 220-grit, prime with bonding primer, apply 2-3 thin coats
- Durability: Properly painted cabinets withstand moisture and last for years with minimal maintenance
Painting bathroom vanity cabinets transforms tired, outdated spaces into fresh, inviting rooms. The high humidity and moisture in bathrooms mean your cabinets take a beating over time—losing their luster, showing water damage, or simply looking dated. But replacement isn’t your only option.
The process requires careful preparation and the right materials. You’ll need to clean thoroughly, sand surfaces for adhesion, apply a moisture-resistant primer, and finish with durable paint designed for humid environments. The biggest advantage? You can complete this project in a weekend and achieve professional-looking results that extend the life of your cabinets by years.
Many homeowners worry about paint adhesion in humid bathrooms or struggle with brush marks and drips. These concerns are valid—but entirely avoidable with proper technique. The key lies in using bathroom-specific primers and paints, maintaining proper ventilation during application, and allowing adequate drying time between coats.
I’m Douglas Smyth, founder of Smyth Painting Company, and I’ve guided countless homeowners through successful bathroom cabinet painting projects since 2005 across Rhode Island and Southeast Massachusetts. Through years of hands-on experience with cabinet refinishing and interior painting in high-moisture environments, I’ve learned what works—and what doesn’t—when transforming bathroom vanities.
Bathroom cabinet painting terms explained:
- Door painting service
- Trim painting service
- Interior plaster repair
The Essential Guide to Bathroom Cabinet Painting
Before you dip your brush into a gallon of paint, it is crucial to understand the environment you are working in. Unlike a bedroom or a living room, the bathroom is a high-traffic, high-moisture zone. This means your choice of materials isn’t just about color—it’s about chemistry.

To achieve a professional-grade finish, you need more than just a brush. Essential tools include drop cloths to protect your tile, a screwdriver for hardware removal, work gloves, safety goggles, and a high-quality respirator. For the application, we recommend a combination of a natural-bristle brush for grooves and a 4-inch microfiber or wool roller for flat surfaces.
Humidity levels in Southern New England can be tricky. When performing bathroom cabinet painting, the ideal conditions are around 70°F with 50-70% humidity. If it’s too humid, the paint won’t dry properly; if it’s too dry, it might “skin over” too fast, leaving visible brush marks.
| Paint Type | Durability | Cleanup | Drying Time | Best Use Case |
|---|---|---|---|---|
| Waterborne Alkyd | High (Furniture-like) | Water | 4-6 hours | High-end wood vanities |
| Oil-Based | Superior | Mineral Spirits | 24 hours | High-moisture/damage |
| Mildew-Proof Latex | Moderate | Water | 1-2 hours | Quick DIY refreshes |
Safety is just as important as the finish. When working in small, enclosed spaces like bathrooms, paint fumes can accumulate quickly. Always keep the exhaust fan running and open any windows. If you are working on an older home in areas like Newport or Bristol, be aware of lead paint risks. According to Scientific research on healthy indoor painting practices, removing old paint can generate lead dust, which requires specialized PPE and wet-sanding techniques to keep your family safe.
Choosing the Best Paint for Bathroom Cabinet Painting
The “best” paint is one that can stand up to steam from the shower and frequent scrubbing. We generally recommend a semi-gloss or satin finish. Why? Because glossier sheens act as a seal, repelling water more effectively than matte or flat paints.
For a top-tier result, look for a water-based urethane-modified alkyd. These modern hybrids, like Sherwin-Williams Emerald Urethane Enamel or Benjamin Moore ADVANCE, offer the hardness and leveling of an oil-based paint but clean up with simple soap and water. They are specifically designed to resist yellowing and withstand the rigors of a bathroom environment.
When it comes to color selection, neutral tones like whites, off-whites, and soft grays remain the safest bet for resale and light reflection. However, bold accents are trending in Rhode Island homes. Deep, muted greens (like the color “Retreat”) or navy blues can turn a sterile white bathroom into a moody, sophisticated retreat.
Preparing Your Vanity for a Flawless Finish
Preparation is 90% of the job. If you skip the prep, your paint will peel—it’s that simple. Start by removing all doors, drawers, and hardware. Pro Tip: Use painter’s tape to label each door and its corresponding hinge location (e.g., “Top Left”). Store the screws in a plastic bag so they don’t vanish into the abyss.
Cleaning is the next critical step. Bathroom cabinets are often coated in hairspray, lotion, and soap scum. Use Trisodium Phosphate (TSP) or a degreasing dish soap to vigorously scrub all surfaces. Rinse twice with clean water to ensure no residue remains, as even a tiny amount of soap can ruin paint adhesion.
Once dry, it’s time for scuff sanding. You aren’t trying to strip the wood to its bare state; you just want to remove the gloss so the primer has “teeth” to grab onto. Use 220-grit sandpaper and always sand with the grain. After sanding, vacuum the dust and use a tack cloth to pick up the microscopic particles that a vacuum might miss. For more complex projects involving damaged wood, you can find more info about cabinet refinishing on our specialized service page.
Step-by-Step Bathroom Cabinet Painting Process
Now for the fun part: the application.
- Priming: Apply a high-quality bonding primer like STIX or Extreme Bond Primer. These are designed to stick to challenging surfaces. If you’re transitioning from a dark wood to a light color, you may need two coats of primer. Let the primer dry for at least 2-3 hours.
- Sanding the Primer: This is the secret to a “factory” finish. Once the primer is dry, lightly sand it with 220-grit sandpaper to knock down any raised grain or dust nibs. Wipe it clean again.
- The First Coat: Start with the cabinet frames, then move to the doors and drawers. Use a brush to “cut in” any recessed panels or grooves, then immediately follow with a roller on the flat areas. This helps eliminate brush marks.
- Wait and Repeat: Do not rush. Most high-quality enamels require at least 4-16 hours between coats. Apply 2-3 thin coats rather than one thick one. Thick coats are prone to drips and “sagging” on vertical surfaces.
For a visual guide on these techniques, you can watch this video for tips on achieving a smooth finish.
Handling Special Surfaces: Laminate and Thermofoil
Not all vanities are made of solid wood. Many builder-grade cabinets in Southeast Mass utilize laminate, thermofoil, or melamine. These surfaces are notoriously difficult to paint because they are non-porous.
If you have peeling thermofoil, you must either remove the loose plastic coating or glue it back down securely before painting. For these surfaces, a liquid deglosser can be used in addition to sanding to help break the surface tension. The most important tool here is a dedicated bonding primer; without it, the paint will literally peel off in sheets. If there are gouges or chips in the laminate, use a high-quality wood filler or epoxy putty to level the surface before you begin the priming stage.
Conclusion and Final Touches
Once the final coat is on, the hardest part begins: waiting. While the paint may feel dry to the touch within a few hours, it takes much longer to “cure.” Curing is the chemical process where the paint reaches its maximum hardness. We recommend waiting at least 24 to 48 hours before reassembling the vanity and 3 to 4 weeks before scrubbing the surface with any cleaning agents.
Long-term maintenance is simple. Avoid harsh abrasive cleaners. A soft cloth with mild soap and water is all you need to keep your bathroom cabinet painting project looking fresh. For those looking to dive deeper into wood care, you can find more info about interior wood refinishing to keep the rest of your home’s woodwork in top shape.
Reassembling Your Bathroom Vanity
Reassembly is where your labeling pays off. Reattach the hinges and hang the doors, checking for proper alignment. If a door is crooked, most modern hinges have adjustment screws that allow you to move the door up, down, or side-to-side.
This is also the perfect time for hardware updates. Swapping out old, tarnished silver pulls for modern matte black or brushed gold can completely change the aesthetic of the room. When removing your painter’s tape, pull it back at a 45-degree angle while the paint is still slightly tacky, or use a sharp utility knife to score the edge if the paint has fully dried to prevent peeling.
If you’re located in the capital area and want to see how we handle these transformations, check out our work regarding Cabinet Refinishing Services in Providence RI.
Professional Results with Smyth Painting Co.
While DIY bathroom cabinet painting is a rewarding weekend project, achieving a truly flawless, “factory-finish” look can be daunting. At Smyth Painting Co., we specialize in taking the stress out of home improvement. Serving Rhode Island and Southeast Massachusetts—from the historic homes of Newport to the modern builds in South Kingstown—we bring nearly two decades of expertise to every vanity we touch.
We pride ourselves on detailed craftsmanship, excellent communication, and eco-friendly options that keep your home safe and beautiful. Whether you need a simple color refresh or a complete restoration of vintage cabinetry, our team ensures a smooth, professional experience from start to finish.
Ready to give your bathroom the upgrade it deserves? Start your residential project today and let us handle the details while you enjoy the results.


