
Why Refinish Your Interior Wood?
Interior wood refinishing restores wooden surfaces like furniture, trim, and cabinets by removing old finishes, repairing damage, and applying new stain and protective coatings. The process involves five key steps:
Key Steps in Interior Wood Refinishing:
- Assess the wood and existing finish
- Strip away old paint, varnish, or stain
- Repair any damage with filler
- Stain the wood to your desired color
- Seal with a protective topcoat for durability
Refinishing can save you up to 50-75% compared to buying new furniture while giving worn pieces a fresh look. It’s also a sustainable choice, preserving quality pieces that might otherwise end up in a landfill. Many homeowners find deep satisfaction in changing a tired, scratched table into a stunning centerpiece with their own hands.
Whether you’re tackling a single dresser or all the trim in a historic home, refinishing breathes new life into wood that has lost its luster. The process requires patience, but the results are well worth it.
I’m Douglas Smyth, founder of Smyth Painting Company. Since 2005, I’ve helped homeowners transform their interiors through countless interior wood refinishing projects. I’m here to share what I’ve learned with you.
, 2. Strip (remove old finish with chemicals or sanding), 3. Repair (fill holes and smooth damage), 4. Stain (apply color to enhance the grain), 5. Finish (seal with protective topcoat for durability) - interior wood refinishing infographic")
Phase 1: Assessment, Tools, and Safety
Before you begin, proper preparation is key. Assess your project, gather your gear, and ensure your workspace is safe. This foundational step is crucial for a smooth interior wood refinishing experience.

Know Your Wood: Solid, Veneer, and Laminate
Your refinishing approach depends entirely on the material.
- Solid Wood: The best candidate for refinishing. It allows for deep sanding and aggressive stripping because the grain runs all the way through.
- Veneer: A thin layer of real wood over a core. It’s fragile and requires caution, as aggressive sanding can easily cause irreparable damage.
- Laminate: A printed pattern over a core, not real wood. It cannot be traditionally refinished by sanding and staining, but it can often be painted.
This is especially important for kitchen cabinets. Learn more about our cabinet refinishing process on our site.
Essential Tools and Materials
- Safety Gear: Rubber gloves, safety goggles, respirator mask.
- Cleaning: Grease remover (or TSP substitute), sponges, rags.
- Finish Removal: Sandpaper (120, 150, 220-grit), sander, chemical strippers, scrapers, 0000-grade steel wool.
- Repair & Prep: Wood filler, wood glue, mineral spirits, tack cloth.
- Application: Stain, topcoat (polyurethane, etc.), high-quality brushes, and lint-free rags.
Safety First: Essential Precautions
Safety is paramount when dealing with chemicals and dust.
- Ventilation: Work in a well-ventilated area with open windows and fans, especially when using chemical products.
- PPE: Wear chemical-resistant gloves, safety goggles, and a respirator mask to protect against fumes and dust.
- Chemicals: Follow all manufacturer instructions. Be aware of warnings and dispose of chemicals and oily rags properly to prevent fires. The EPA offers guidance at www.epa.gov/hw/household-hazardous-waste-hhw.
- Lead Paint: Pieces made before 1978 may have lead paint. If suspected, consult a professional or learn about lead paint safety.
Refinishing vs. Restoring
- Refinishing: Completely removes the old finish to update the look or add durability. It involves stripping, repairing, staining, and sealing.
- Restoring: Aims to preserve the original finish and character. It involves cleaning and repairing the existing finish to maintain an antique’s patina and value.
For historic pieces, restoration is often preferred. The GSA provides guidance on historic woodwork.
Phase 2: Stripping and Preparing the Surface
Now that you’re prepped, it’s time to remove the old finish and prepare the bare wood. This is the most critical stage of interior wood refinishing, as the quality of your final finish directly reflects the care you take here.

How to Remove the Old Finish
The best method depends on the finish, the wood, and your comfort level.
- Sanding: Best for flat surfaces with minor finish degradation. It’s chemical-free but labor-intensive and dusty. Start with 120-grit sandpaper, then move to 150- and 220-grit, always sanding with the grain. Be careful not to damage veneer.
- Chemical Strippers: Often the fastest method, especially for intricate details. They require excellent ventilation, PPE, and careful disposal. Apply a thick coat, wait for the finish to bubble, then gently scrape it off. Clean the wood as directed by the manufacturer.
- Heat Gun: Effective for thick paint or varnish but can scorch the wood. Move the heat gun until the finish bubbles, then scrape immediately.
For most DIY projects, a combination of chemical strippers and sanding is most efficient. Always dispose of chemicals safely per EPA guidelines.
Preparing the Bare Wood for a Flawless Finish
Once stripped, the bare wood needs final prep.
- Clean Residue: Wipe the wood with a cloth dampened with mineral spirits to remove any residue from stripping. Let it dry completely.
- Final Sanding: Sand with 150-grit paper, then finish with 220-grit for overall smoothness. Don’t sand too fine if you plan to stain, as it can prevent absorption. Always sand with the grain to avoid scratches that stain will highlight. A poor sanding job cannot be hidden by stain or varnish.
- Remove Dust: Vacuum the surface, then wipe it down with a tack cloth. A tack cloth is essential for picking up fine dust particles. The surface must be completely dust-free before moving on.
Phase 3: Repairing, Staining, and Sealing
With a prepped surface, you can now fix imperfections and add color.
Fixing Minor Damage
- Scratches and Dents: Sand out light scratches. Use a color-matched wood filler for deeper gouges, then sand it smooth.
- Water Rings: For white rings, try gently ironing the spot through a dry cloth on low heat (no steam). Products like Howard’s Restor-A-Finish are also effective.
- Steam for Dents: For compressed wood fibers, place a damp cloth over the dent and apply a hot iron for a few seconds to help the fibers swell.
- Grain Filler: For a glass-smooth finish on open-grained woods like oak, use a grain filler to fill the pores before staining.
The Role of Sanding Sealer
Sanding sealer acts like a primer for wood. It’s highly recommended for blotch-prone woods like pine or maple to ensure a uniform stain color.
- Benefits: It prevents blotchy staining and allows for a final light sanding for an ultra-smooth surface.
- Application: Apply a thin coat, let it dry, then lightly sand with 220- or 320-grit paper. Clean all dust with a tack cloth before staining.
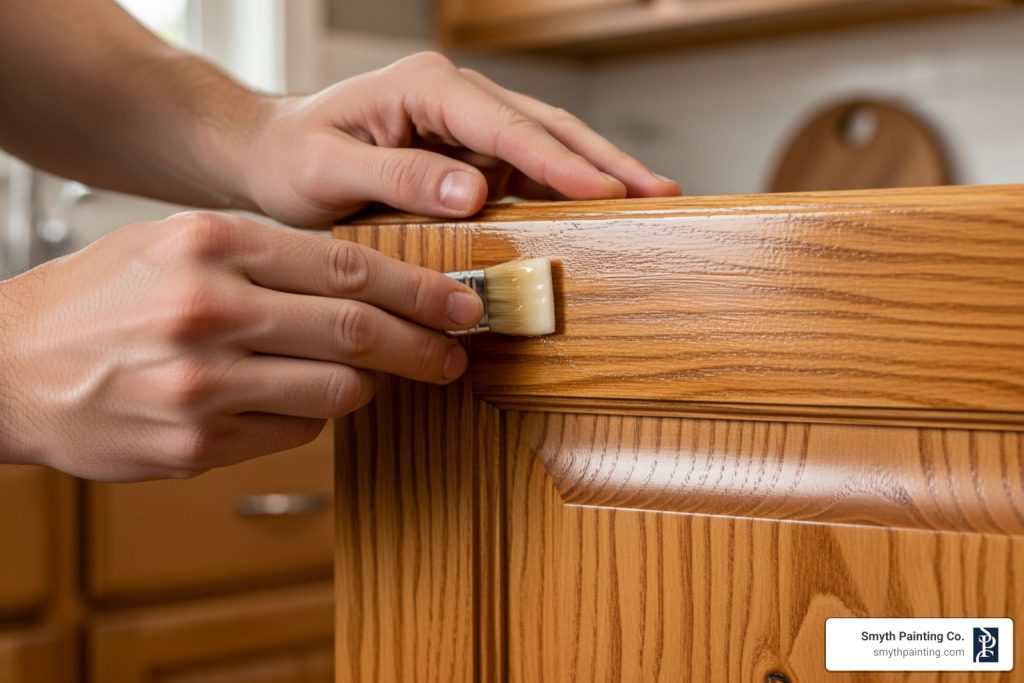
Choosing and Applying the Perfect Wood Stain
Stain gives wood its personality. The type and color dramatically impact the final look.
- Types of Stains:
- Oil-Based: Traditional, deep-penetrating, and slow-drying.
- Water-Based: Eco-friendly, fast-drying, and clean up with water.
- Gel Stains: Thick, surface-level stains that provide very even color.
- Testing is Crucial: Always test your stain on a hidden area or scrap wood to confirm the color before committing.
- Application:
- Apply stain evenly with a brush or rag, working with the grain.
- Let it penetrate for 5-15 minutes.
- Wipe off all excess stain with a clean rag. This is vital. For a darker color, apply a second coat after the first has dried.
- Allow the stain to dry completely (12-24 hours) before topcoating.
The Complete Guide to Applying a Durable Topcoat
The topcoat is the final protective layer that seals your work and provides durability.
| Finish Type | Durability | Look | Application |
|---|---|---|---|
| Polyurethane | Excellent (water, alcohol, scratch resistant) | Hard, plastic-like, clear to amber tint | Brush, wipe-on, spray; multiple thin coats, sanding between; long drying. |
| Lacquer | Very good (durable, luscious) | Clear, high sheen possible | Spray (ideal), brush (quick work needed); dries very fast; multiple thin coats. |
| Penetrating Oil | Good (less protective, easy to repair) | Natural, satin, improves wood grain | Wipe on, let soak, wipe off excess; multiple coats; easy to reapply/repair. |
| Shellac | Fair (sensitive to water, alcohol, heat) | Warm amber, high gloss possible | Brush (dries fast); multiple thin coats; easy to repair; natural. |
| Varnish | Good (hard, durable, various resins) | Clear to amber, various sheens | Brush; multiple thin coats, sanding between; long drying. |
Common Topcoats for Interior Wood Refinishing
- Polyurethane: The go-to for durability. Oil-based versions add a warm amber tint, while water-based versions dry clear and fast with low odor.
- Lacquer: A fast-drying, high-gloss finish that’s very durable but best applied with a sprayer.
- Shellac: A natural, fast-drying finish that’s easy to repair but less durable against water and alcohol.
- Varnish: A traditional, hard, and durable film-forming finish.
- Penetrating Oil: Soaks into the wood for a natural look that’s easy to repair but less protective against spills.
Our guide on paint finishes offers more details on finish characteristics.
How to Achieve a Smooth Application
- Use a High-Quality Brush: Apply in long, smooth strokes with the grain.
- Apply Multiple Thin Coats: This is the golden rule to prevent runs, drips, and uneven drying.
- Sand Between Coats: For film-forming finishes, lightly sand with 220- or 320-grit paper after each coat dries to ensure smoothness and adhesion. Always remove dust with a tack cloth.
- Respect Drying Times: Follow the manufacturer’s instructions for drying between coats and before use. Full curing can take days or weeks.
- Avoid Bubbles and Drips: Stir finish gently (never shake). Smooth out drips immediately or sand them away after drying.
Common Mistakes and Pro Tips
Even seasoned DIYers can make a misstep. Learning from common errors and using professional techniques can lift your interior wood refinishing project from good to great.
Key Mistakes to Avoid in Your Refinishing Project
- Improper Prep: Skipping cleaning, sanding against the grain, or failing to remove all dust will compromise your final finish.
- Rushing Drying Times: Applying a new coat before the previous one is dry leads to a sticky, weak finish.
- Applying Thick Coats: This is a common mistake that causes drips, runs, and uneven drying. Always opt for multiple thin coats.
- Shaking the Can: Shaking your finish introduces air bubbles. Stir gently instead.
- Sanding Against the Grain: This leaves visible scratches that stain will only highlight.
- Not Testing Stain/Finish: Always test on an inconspicuous area first to ensure you like the color and result.
- Ignoring Safety: Working without proper ventilation or PPE is a health hazard. Your safety is paramount.
Our guide on DIY painting pitfalls offers more insights into common homeowner mistakes.
Pro Tips for a Flawless Finish
- Use a Wood Conditioner: On blotch-prone woods like pine or cherry, a pre-stain conditioner ensures even stain absorption.
- Wipe Off Excess Stain: After letting it penetrate, wipe off all excess stain thoroughly. Leftover stain becomes a sticky mess that won’t cure properly.
- Use High-Quality Brushes: A good brush applies finish evenly and won’t shed bristles into your work.
- Ensure Proper Lighting: Good lighting helps you spot and fix drips, dust, or uneven spots before they dry.
- Control Temperature and Humidity: Work in moderate temperatures (65-75°F) and low humidity for best results. Avoid direct sunlight or drafts.
- Work in Sections: On large pieces, work in manageable sections to prevent the stain or finish from drying too quickly.
- Know When to Call a Pro: For valuable antiques, large built-ins, or if you’re out of your comfort zone, hiring a professional is a smart investment.
Frequently Asked Questions about Interior Wood Refinishing
We often hear similar questions from homeowners across Rhode Island and SE Mass about interior wood refinishing. Here are answers to some of the most common ones.
Can you refinish wood without stripping it completely?
Yes, depending on the finish’s condition and your goal.
- For Restoration: If the finish has only minor scratches or fading, you can often revive it without stripping. Products like Howard’s Restor-A-Finish can blend blemishes and restore luster, preserving an antique’s patina.
- For a Light Refresh: If the finish is thin or you want a slight color change, you can scuff-sand the surface to help a new topcoat adhere. However, this won’t work for a complete color change with a new stain, as the old sealer will block penetration.
- For a New Look: If the finish is peeling, heavily damaged, or you want to apply a new stain color, you must strip the piece down to bare wood.
What’s the difference between refinishing solid wood and veneer?
The main difference is the thickness of the wood layer. Solid wood is forgiving and can be sanded deeply to remove imperfections. Veneer is a very thin layer of wood, so you must be extremely cautious when sanding to avoid going through it and exposing the core material underneath. For veneer, chemical strippers are often a safer choice than aggressive sanding.
How do you fix white water rings on wood furniture?
White rings are moisture trapped in the topcoat. Here are a few methods to try:
- Gentle Heat: Place a dry cotton cloth over the ring and gently iron it on a low, no-steam setting. The heat helps draw out the moisture.
- Mayonnaise or Toothpaste: Apply a dab of mayonnaise or non-gel toothpaste to the ring, let it sit for a few hours, then wipe it clean. The oils or mild abrasives can help lift the mark.
- Specialized Products: Use a product like Howard’s Restor-A-Finish, which is formulated to remove white heat rings and water marks.
Always test any method on an inconspicuous spot first!
Conclusion: Enjoy Your Beautifully Renewed Woodwork
We hope this guide to interior wood refinishing has empowered you to tackle your next project. From assessment and stripping to the final topcoat, each step contributes to a stunning change.
The benefits are clear: you save money, make a sustainable choice, and gain satisfaction from your own craftsmanship. Whether it’s a vintage dresser in Jamestown or the trim in a historic Newport home, your renewed woodwork will add warmth and character to your space.
Patience and attention to detail are your best tools. The reward of seeing a worn piece restored to its former glory is priceless.
For complex projects, valuable antiques, or when you simply want guaranteed professional results, don’t hesitate to reach out. Our team at Smyth Painting Co. brings years of experience in interior wood refinishing and restoration to homes across Rhode Island and SE Mass. We’re here to help you achieve the beautiful interior you envision.
Explore our interior painting services to learn more about how we can transform your home.


